Saturday, December 31, 2016
Monday, December 26, 2016
Saturday, December 24, 2016
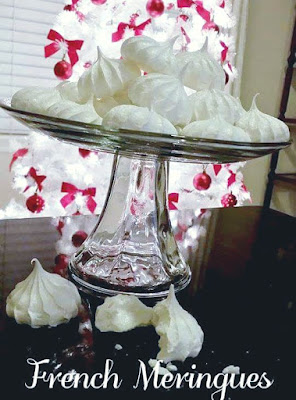
French Meringues
How To Make Meringue
Makes about 4-dozen 2-inch cookies
What You Need
Ingredients
3 large egg whites
3/4 cup granulated sugar
1/4 teaspoon cream of tartar
1/2 teaspoon vanilla extract (optional)
Pinch salt (optional)
Equipment
Clean mixing bowl
Whisk or electric mixer
Baking sheet pan
Parchment paper
Piping bag
Piping tip
Rubber spatula
Instructions
Preheat your oven to 215°F. Line a baking sheet with parchment paper and set aside.
Begin whisking the egg whites with the whisk attachment on medium low. Place the egg whites in the mixer bowl and begin whisking. Be sure that the mixing bowl and whisk are free from grease and that the egg whites do not have any bits of egg yolks in them.
Add in the cream of tartar, vanilla, and salt, if using.
Increase speed to medium and start adding sugar. After the whites begin to foam, bump up the mixer to medium speed and gradually start adding in the sugar. As the eggs whites are whisked, air is incorporated. Little air bubbles will start to form and the egg whites will foam. They will still be too liquidy to hold any shape. Once they begin to foam, begin adding in the sugar, a little bit at a time.
Watch for the "soft plop" stage. The foam and air bubbles will start to tighten and the whites will become opaque. The "soft plop" stage describes eggs whites that hold onto the whisk but do not form peaks.
Add the remaining sugar as the whites turn into "soft peaks." Continue adding in the sugar until the whites begin to form soft peaks. Here, the whites will begin to hold their shape, but will eventually slump over and melt back into the bowl.
Increase the speed to medium-high. After the whites begin to hold their shape, bump up the mixer to medium-high until they hold firm peaks.
Watch for the "firm peaks" stage. Firm peaks are achieved when whites hold their shape. If you pull the whisk straight out of the bowl, a peak will form. At this stage, the tip of the peak will fold back over onto itself.
Add gel food coloring or additional flavors, if using. Mix in a tiny bit of gel food coloring or other extracts until the whites hold stiff peaks.
Watch for the "stiff peaks" stage. The stiff peaks stage is what we are trying to achieve. At this point, the peaks should stand up nice and straight. The whites will be glossy and smooth. If you rub a bit between your fingertips, it should feel silky (meaning the sugar has completely dissolved.)
Fold in any other ingredients, if using. Gently fold in chopped nuts, chocolate, etc. with a large rubber spatula.
Fill the piping bag with meringue. Fit a piping bag with a plain or star tip. Unfold the top of the piping bag about halfway, then use a rubber spatula to fill the bag with the meringue. Fill the bag only 1/2 to 3/4 of the way full to prevent the meringue from spilling out the top of the bag.
Pipe out the meringue. Gently squeeze the piping bag to push out any air pockets before getting started. Pipe meringue kisses by holding the bag perpendicular to the baking sheet. Hover the top slightly over the sheet and pipe a "kiss" of meringue: pipe the meringue, stop pressing the bag, then pull up on the bag. (Alternatively, you can use a soup spoon to scoop large, rustic meringues.)
Bake for 60 to 90 minutes. Depending on the size of your meringue, bake for about 60 minutes, or until the outside is crisp and the inside is dry yet chewy. They should feel light and hollow. When done, the meringue should easily peel off the parchment paper. Turn the oven off, crack the door open, and let the meringue cool completely in the oven.
Thursday, December 15, 2016
Saturday, December 3, 2016
How To Make French Meringue
Makes about 4-dozen 2-inch cookies
What You Need
Ingredients
3 large egg whites
3/4 cup granulated sugar
1/4 teaspoon cream of tartar
1/2 teaspoon vanilla extract (optional)
Pinch salt (optional)
Equipment
Clean mixing bowl
Whisk or electric mixer
Baking sheet pan
Parchment paper
Piping bag
Piping tip
Rubber spatula
Instructions
Preheat your oven to 215°F. Line a baking sheet with parchment paper and set aside.
Begin whisking the egg whites with the whisk attachment on medium low. Place the egg whites in the mixer bowl and begin whisking. Be sure that the mixing bowl and whisk are free from grease and that the egg whites do not have any bits of egg yolks in them.
Add in the cream of tartar, vanilla, and salt, if using.
Increase speed to medium and start adding sugar. After the whites begin to foam, bump up the mixer to medium speed and gradually start adding in the sugar. As the eggs whites are whisked, air is incorporated. Little air bubbles will start to form and the egg whites will foam. They will still be too liquidy to hold any shape. Once they begin to foam, begin adding in the sugar, a little bit at a time.
Watch for the "soft plop" stage. The foam and air bubbles will start to tighten and the whites will become opaque. The "soft plop" stage describes eggs whites that hold onto the whisk but do not form peaks.
Add the remaining sugar as the whites turn into "soft peaks." Continue adding in the sugar until the whites begin to form soft peaks. Here, the whites will begin to hold their shape, but will eventually slump over and melt back into the bowl.
Increase the speed to medium-high. After the whites begin to hold their shape, bump up the mixer to medium-high until they hold firm peaks.
Watch for the "firm peaks" stage. Firm peaks are achieved when whites hold their shape. If you pull the whisk straight out of the bowl, a peak will form. At this stage, the tip of the peak will fold back over onto itself.
Add gel food coloring or additional flavors, if using. Mix in a tiny bit of gel food coloring or other extracts until the whites hold stiff peaks.
Watch for the "stiff peaks" stage. The stiff peaks stage is what we are trying to achieve. At this point, the peaks should stand up nice and straight. The whites will be glossy and smooth. If you rub a bit between your fingertips, it should feel silky (meaning the sugar has completely dissolved.)
Fold in any other ingredients, if using. Gently fold in chopped nuts, chocolate, etc. with a large rubber spatula.
Fill the piping bag with meringue. Fit a piping bag with a plain or star tip. Unfold the top of the piping bag about halfway, then use a rubber spatula to fill the bag with the meringue. Fill the bag only 1/2 to 3/4 of the way full to prevent the meringue from spilling out the top of the bag.
Pipe out the meringue. Gently squeeze the piping bag to push out any air pockets before getting started. Pipe meringue kisses by holding the bag perpendicular to the baking sheet. Hover the top slightly over the sheet and pipe a "kiss" of meringue: pipe the meringue, stop pressing the bag, then pull up on the bag. (Alternatively, you can use a soup spoon to scoop large, rustic meringues.)
Bake for 60 to 90 minutes. Depending on the size of your meringue, bake for about 60 minutes, or until the outside is crisp and the inside is dry yet chewy. They should feel light and hollow. When done, the meringue should easily peel off the parchment paper. Turn the oven off, crack the door open, and let the meringue cool completely in the oven.
Recipe Notes
Storage: Baked meringue may be stored in a covered container at room temperature for a few days. Do not refrigerate.
Tuesday, November 22, 2016
How to Make Self-Rising Flour
Self-rising flour is a staple ingredient in so many southern recipes! Learn how to make your own self-rising flour with this quick and easy substitution recipe. All you need are 3 simple ingredients!
Author: Robyn Stone | Add a Pinch
Serves: 1 cup
Ingredients
1 cup all-purpose flour
1½ teaspoons baking powder
¼ teaspoon salt
Instructions
Measure all ingredients and whisk to combine.
Notes
Measurements to equal each cup of self-rising flour.
Author: Robyn Stone | Add a Pinch
Serves: 1 cup
Ingredients
1 cup all-purpose flour
1½ teaspoons baking powder
¼ teaspoon salt
Instructions
Measure all ingredients and whisk to combine.
Notes
Measurements to equal each cup of self-rising flour.
Moist Yellow Cake
INGREDIENTS
*****
For the cake:
2 sticks of butter, room temperature
2 cups of sugar
4 eggs, room temperature
3 cups of self-rising flour, sifted
1 cup of whole milk, room temperature
1 teaspoon pure vanilla extract
1/2 teaspoon butter flavoring
For the frosting:
2 sticks butter, room temperature
1 teaspoon pure vanilla extract
1 pound powdered sugar
1 to 3 teaspoons milk, half and half, or cream
Icing colors
DIRECTIONS
For the cake: Preheat oven to 350° F.
Grease and flour 3 8-inch cake pans.
Using a mixer, cream butter until fluffy. Add sugar and continue to cream for about 7 minutes.
Add eggs one at a time. Beat well after each egg is added.
Alternate adding flour and milk to creamed mixture, beginning and ending with flour.
Add vanilla and butter flavoring to mix, until just mixed.
Divide batter equally into 3 cake pans.
Hold each layer about 3 inches above your counter and carefully drop the pans flat onto counter several times to ensure release of any air bubbles. This will help you have a more level cake.
Bake for 25 to 30 minutes (depending on your oven) until done.
Cool in pans for 5 to 10 minutes. Remove and immediately wrap each layer in plastic wrap to seal in moisture. Cool completely on wire racks.
Once cooled, you are ready to assemble your cake.
For the frosting: Using a mixer, cream softened butter and vanilla until smooth.
Add sugar gradually, allowing butter and sugar to cream together before adding more.
If you want your frosting a little creamier, add a teaspoon of milk at a time and beat on high until you get the right texture.
Use icing colors to tint the frosting the color of your choice.
Monday, November 21, 2016
Thursday, October 27, 2016
Saturday, October 8, 2016
Woodland Baby Shower Cake
#homemade #baker #marblecake #chocolatefilling #woodlandtheme #babyshower #deer #fox #hedgehog #babyshowercake #customcakes #fondantcake #cakecakecake #cakelovers #loveit #cakegram #instacake #cakestagram #cakedesign #decoration #cakesbyzana
Sunday, September 18, 2016
Subscribe to:
Posts (Atom)


